Let's jump in and make some stylized vector dog tags in Illustrator.
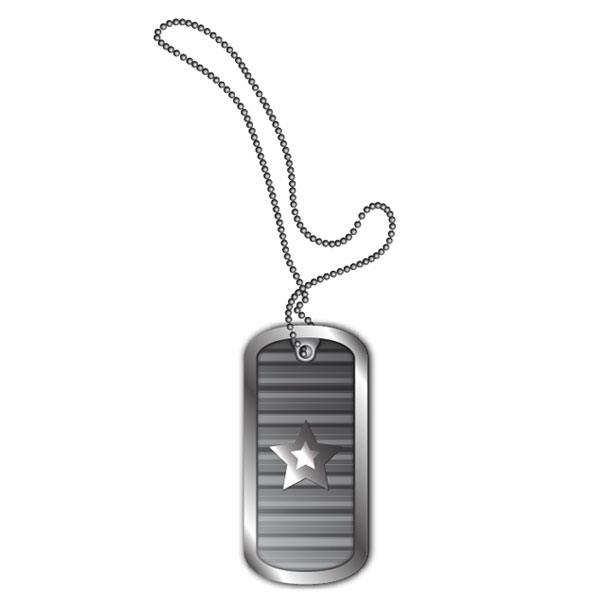
Final Image Preview
Let's have a look at the image we'll be creating.

Step 1
Open up a new document and draw a rectangle with a width of 72 pt and a height of 115 pt. You can open up the Rectangle Palette by selecting the Rectangle Tool(M) and clicking once on the artboard.

Step 2
Fill the rectangle with a dark gray and put guides around it.

Step 3
Draw a vertical guide into the middle of the rectangle. If you make the rectangle an active selection, you can see its center point and use it as an alignment for the guide. Start creating a half-ellipse like shape with the Pen Tool (P). Keep the Fill (X) the same dark gray and leave the Stroke empty.


Step 4
Once you have created the half-round shape, duplicate and rotate it, and place it below the rectangle shape. Then select all three shapes and select the Shape Modes of Add to Shape located in the Pathfinder Palette. This will join all shapes.


Step 5
Select the two vertical points on the left side and click Command + Alt + J to open the Average Palette. Choose the Vertical Axis and click OK. Repeat this with the other side of the rectangle.

Step 6
Before we continue, I would like to show how many shapes we will be needing. Out of the just created shape in Step 5, we'll be creating (from left to right) two frame shape objects, three main shapes with a hole, and two inner shapes with a line pattern. All these shapes together will make up our dog tag.

Step 7
Make a copy of the main shape on top (Command + C + F) and lock the first shape. Then go to Object > Path > Offset Path, and Choose -7 pt. Select both, the offset shape and the original one, and choose the Divide option from the Pathfinder Palette. This will give us two separate shapes. Then delete the inner shape.


Step 8
Select the frame like shape and fill it with a linear black to white gradient. Also, set the Angle to 35 degrees.

Step 9
Unlock your original shape, make another duplicate, and then lock the original shape again. Create a small circle and place it in the top middle of the shape. Select both and choose the Divide option from the Pathfinder Palette. This will give us our hole.

Step 10
Fill the shape with a light Gradient and keep the Angle at 35 degrees.

Step 11
Duplicate this shape again on top (Command + C + F) and fill it with a graphic pattern. I chose "6 lpi 50%" from the Basic Graphic_Lines in the Swatch library.

Step 12
Now we need to subtract our frame shape from the just created line-filled shape. Do so by duplicating the frame shape and then select them both. Then select the Divide option from the Pathfinder Palette. Delete the outer shape. Then create a small circle, move it slightly out of the lined shape, and choose the Divide option again.


I altered the path here a little to move it closer to the hole.
Step 13
Select the line-filled shape and add an Inner Glow to it. Mark the settings as Mode at Normal, Color of Black, Opacity at 100%, and Blur at 8 pt. Then set the Transparency Blend Mode to Overlay and its Opacity to 42%.

Step 14
Select the light gray shape with the hole beneath the lined shape and add an Inner Glow with the same setting, just choose a light gray color and set the Blur to 5 pt.

Step 15
To give it a bit more depth, we can add a Stroke to our line-filled shape. I chose a light gray color with a Stroke Weight of 1 pt.

Step 16
Next, select the gradient filled frame shape and make a duplicate on top (Command + C + F). Then fill it with a dark gray and set the Transparency to Screen at a 100% Opacity.


Step 17
Select our line-filled shape and make a duplicate on top of it (Command + C + F). Fill it with a basic graphic pattern. I chose "10 lpi 40%" from the Swatch library. Then set the Transparency to Overlay with an Opacity of 42%.

Step 18
Let's add a star. Choose the Star Tool in the Rectangle Tool Section and create a small 5 point star and fill it with a linear gradient.

Step 19
Offset the star by 0.25 pt and fill this new added shape with a dark gray. You might want to zoom in and then move it a point to the right-bottom. You can do this by using the Arrow keys on your keyboard. This will give the star some depth.

Step 20
Select the light gray filled shape (that already has an Inner Glow) and add an Outer Glow. Set the Mode to Normal, Opacity to 75%, and the Blur to 2 pt. Create a smaller star with a linear gradient on top of the bigger star.

Step 21
Let's create the chain. Draw a line just like the one you see in the image or something similar. Set the Stroke weight to 0.25 pt and Stroke color to black. Make a copy of it, place it on a new layer, and hide it, as we'll be needing it later.

Step 22
Create a circle about 4 pt in diameter. Fill it with a radial gradient. Then make a copy (Command + C), paste it on the Art Board (Command + V), and move it away from the first circle. Go to Object > Blend > Blend Options, choose the Specific Steps as Spacing, enter the number 15, and click OK. Nothing will happen yet. Select both circles and hit the keys Command + Alt + B. This will give us our chain links.
As you can see, we might need some more chain links. Since we haven't expanded our blends, we can easily modify it by opening up the Blend Options again and enter a higher number. This time you can also choose the Preview option, just in case you want the chain links to be closer.


Step 23
Select the chain link blend and the chain path we created earlier in Step 21. Then got to Object > Blend > Replace Spine. Now our chain is almost ready. If there are some gaps in the chain, you can easily fill them with more chain circles by adding path points to the spine. To do so, just select the Pen Tool (T) and click on the spine. You can fiddle around with the handles and close any gaps that way.

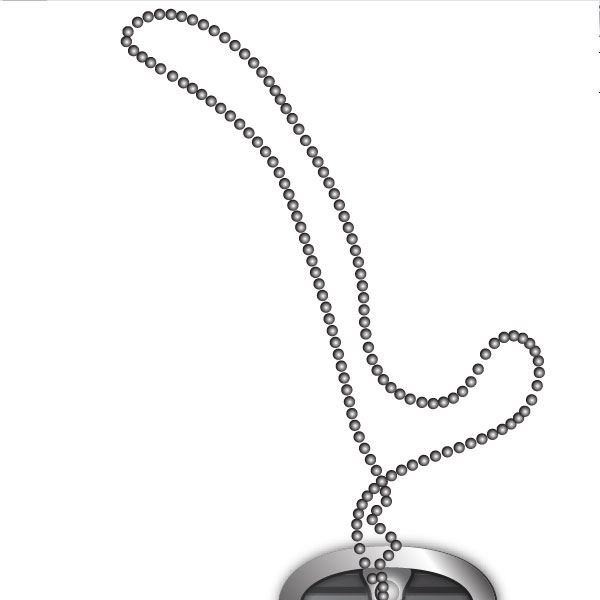
Step 24
Unhide the copy of the chain path from earlier. Then set the Stroke Weight to 0.25 pt. Place it behind the chain link blend. And there we have the complete chains!

Step 25
To hide parts of the chain and make it look like it's behind the dog tag and comes through the hole, I broke up the unexpanded blend, and made a smaller part that I simply placed under the dog tag layer. If you would like to, you can add an Outer Glow to the chain.
Conclusion
I created a background with a dark gray and dark greenish blue radial gradient and added a line-filled shape. I also duplicated the whole dog tag and rotated it counterclockwise. Small tip: the applied graphic lines will stay horizontal, therefore you need to expand their appearance before rotating. That's it!